Table of Contents
Using Ollama
What is Ollama?
Ollama is a free, open-source tool that lets you download and run large language models (LLMs) directly on your Windows, Mac, or Linux PC. Once installed, it runs a local server in the background that applications like WebHarvy can connect to - just like connecting to a cloud AI service, but entirely on your own computer.
This means you get the benefits of AI-assisted web scraping without any ongoing costs or privacy concerns.
Video
The following video shows how to connect WebHarvy with Ollama and scrape data from websites using AI.
Step 1: Install Ollama on Windows
Installing Ollama on Windows is straightforward - just download and run the installer.
- 1. Open your browser and go to https://ollama.com/download/windows.
- 2. Click the Download for Windows button. This downloads an installer file named something like
OllamaSetup.exe. - 3. Once downloaded, double-click the installer file to run it.
- 4. Follow the on-screen prompts and click Install. The installation takes only a minute or two.
- 5. After installation, Ollama starts automatically and runs silently in the background. You will see the Ollama icon in the Windows system tray (bottom-right of your taskbar).
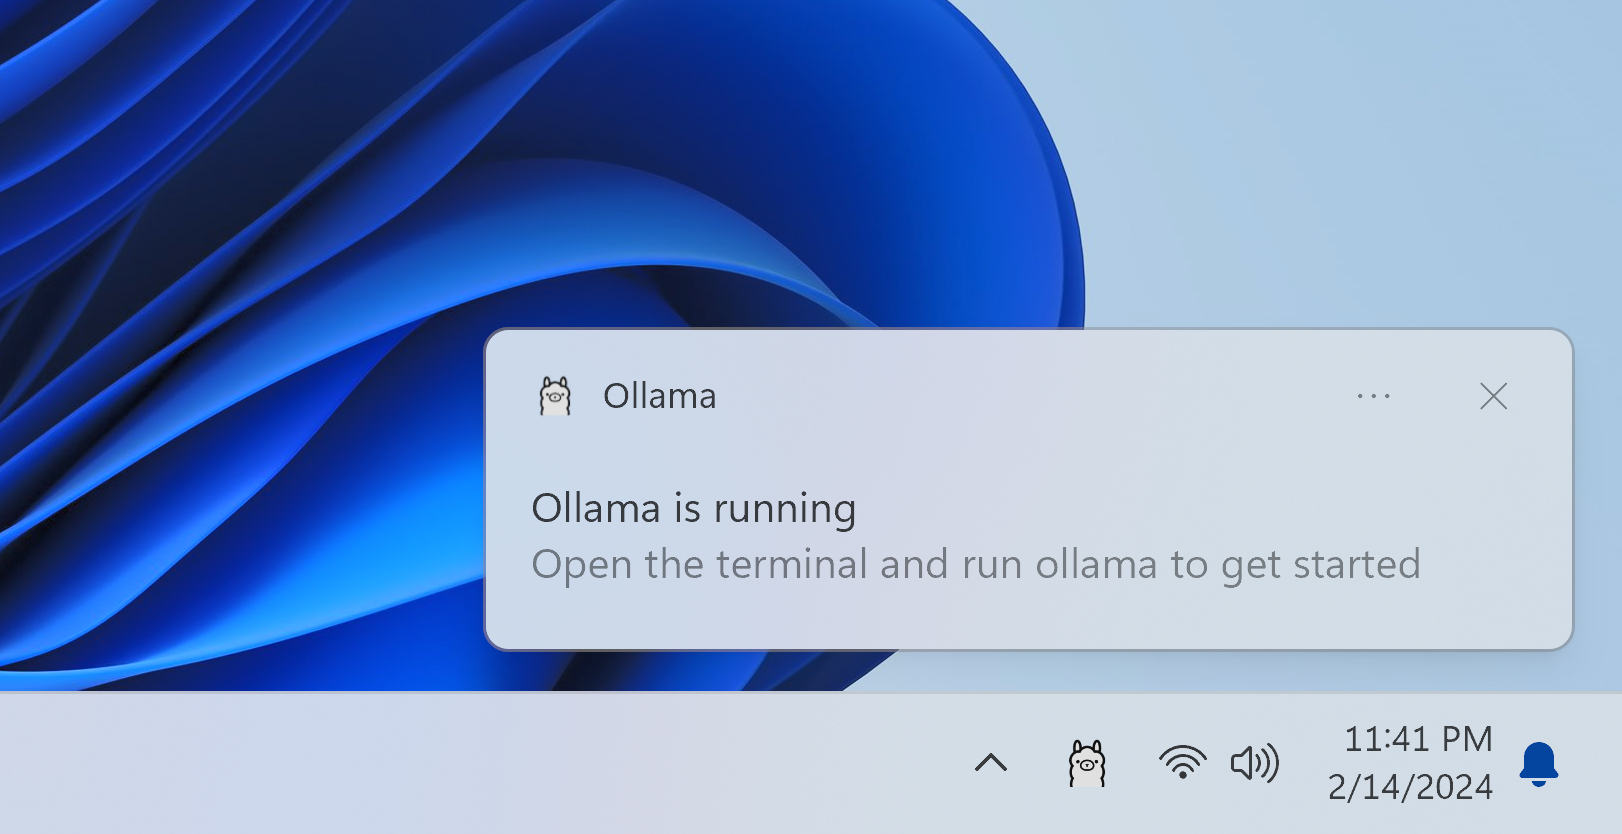
That's it! Ollama is now installed and running on your PC.
Step 2: Choose an AI Model
Ollama supports a wide range of open-source AI models. You can browse all available models at the official Ollama model library:
On this page you will find popular models such as Llama 3, Mistral, Phi-3, Gemma, and many others. Each model listing shows the model's size, the hardware requirements, and a description of what it is good at.
For general web scraping and data extraction tasks, a mid-size model like llama3.2 or mistral works well without requiring a high-end GPU. If you have a newer PC with a dedicated graphics card, you can run larger, more capable models.
Once you have picked a model, note down its name - you will need it in the next step.
Step 3: Download and Run the Model
To download and start a model, you use the Windows Command Prompt (also called the terminal or command line).
How to open the Command Prompt
- 1. Press the Windows key on your keyboard (or click the Start button).
- 2. Type
cmdin the search box. - 3. Click on Command Prompt in the search results to open it.
A black window with a blinking cursor will appear. This is the Command Prompt.
Run the model
In the Command Prompt window, type the following command and press Enter:
ollama run llama3.2
Replace llama3.2 with the name of whatever model you chose from the library. If the model is not yet downloaded, Ollama will automatically download it first (this may take a few minutes depending on your internet speed and the model size). Once it finishes, the model will start and be ready to accept requests.
You can close the Command Prompt window - the model will continue running in the background, and Ollama will serve it on http://localhost:11434 by default.
Step 4: Connect Ollama to WebHarvy
With Ollama running, open WebHarvy and configure it to use the local model for AI-assisted extraction.
- 1. In WebHarvy, open Settings (from the main menu or toolbar).
- 2. Go to the AI tab in the Settings window.
- 3. Under the AI provider options, select Ollama.
- 4. In the Server URL field, enter:
http://localhost:11434 - 5. In the Model field, enter the model name you are running - for example,
llama3.2. - 6. Click Save or OK to apply the settings.
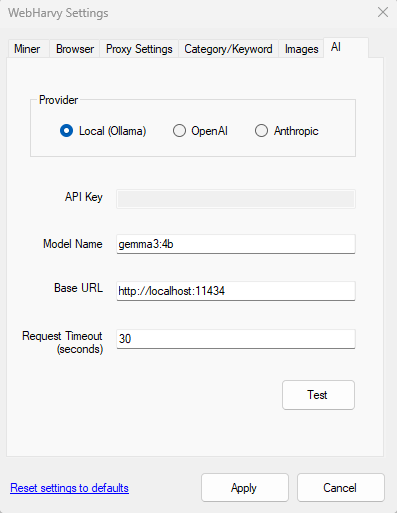
WebHarvy will now use your local Ollama model whenever the AI extraction feature is used. No API key or internet connection is required for the AI part.
For more details, refer to the Web Scraping using AI page.
Step 5: Scrape Using AI in WebHarvy
Once Ollama is connected, you can use AI-assisted extraction while configuring a scrape:
- 1. In WebHarvy, navigate to the website you want to scrape.
- 2. Click anywhere on the page to start selecting data.
- 3. In the selection options that appear, click More Options and then choose Extract with AI.
- 4. In the dialog that opens, select the area of the page to extract from - either the section highlighted using the mouse or the entire page.
- 5. Choose whether to extract from the displayed text or the underlying HTML code.
- 6. Type a prompt describing what data you want to extract - for example: "Extract the product rating"
- 7. Click Extract. WebHarvy will send the content to your local Ollama model and return the extracted data.
- 8. Click the Add button to add the selected data to your configuration.
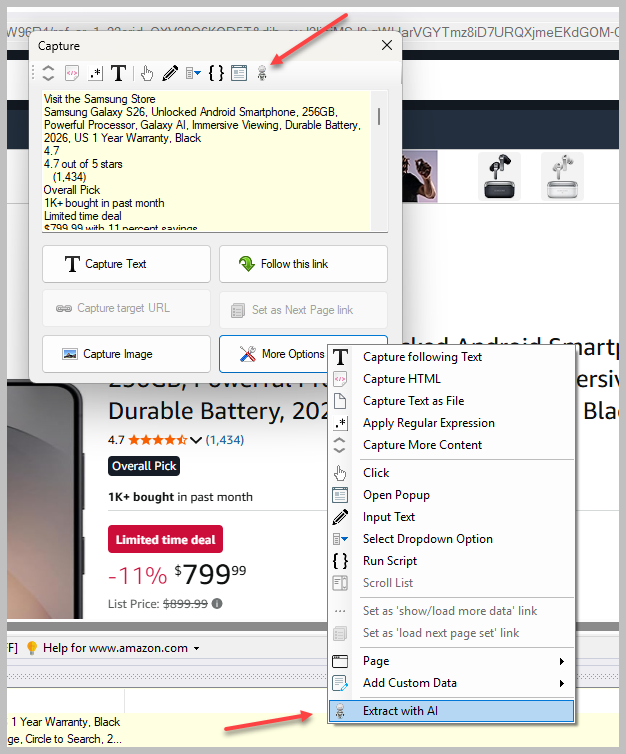
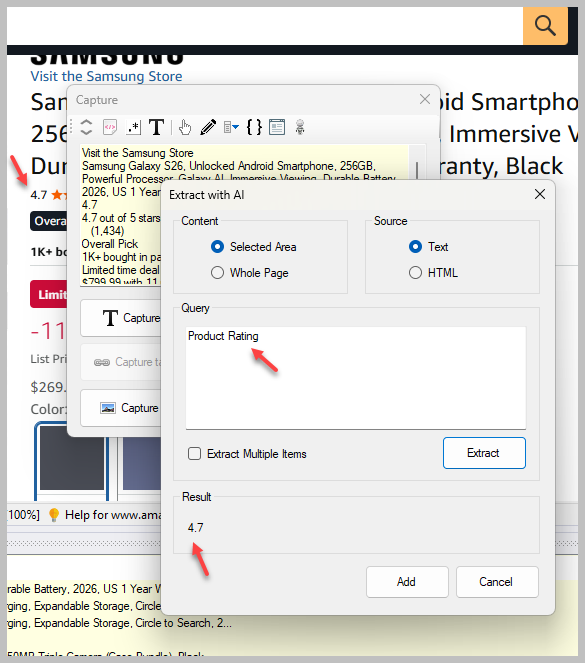
This approach is particularly useful for pages with unstructured content, such as extracting summaries, sentiment, or data that does not have a clear repeating HTML structure.
Using LM Studio
What is LM Studio?
LM Studio is a free desktop application for Windows, Mac, and Linux that lets you discover, download, and run open-source AI models locally - all through a user-friendly graphical interface, with no command line required.
LM Studio includes a built-in local server that is compatible with the OpenAI API format, so WebHarvy can connect to it just as it would connect to a cloud AI service. Your data stays entirely on your PC and there are no usage costs.
Video
The following video shows how to set up LM Studio and connect it to WebHarvy for AI-assisted web scraping.
Step 1: Download and Install LM Studio
- 1. Open your browser and go to https://lmstudio.ai.
- 2. Click the Download for Windows button and save the installer.
- 3. Run the installer and follow the on-screen prompts. LM Studio installs like any standard Windows application.
- 4. Once installation is complete, launch LM Studio from your desktop or Start menu.
Step 2: Download a Model in LM Studio
LM Studio has a built-in model browser so you can find and download AI models without leaving the app.
- 1. In LM Studio, click the Discover icon (magnifying glass) in the left sidebar.
- 2. Use the search box to find a model - for example, search for
llama,mistral, orphi. - 3. Browse the results. Each model listing shows the size (in GB) and the minimum RAM required. Choose a variant that fits your hardware - smaller models (3B–8B parameters) run well on most modern PCs even without a dedicated GPU.
- 4. Click the Download button next to your chosen model. LM Studio will download it in the background. You can see progress in the bottom bar.
Once the download finishes, the model is saved locally on your PC and can be used without an internet connection.
Step 3: Start the Local Server
LM Studio's local server is what WebHarvy connects to. You need to load your model into the server and start it before opening WebHarvy.
- 1. Click the Developer icon (looks like
</>) in the left sidebar to open the Local Server panel. - 2. At the top of the panel, click the model selector dropdown and choose the model you downloaded.
- 3. Click Load Model. LM Studio will load the model into memory - this may take a few seconds.
- 4. Click the Start Server button. The server will start and display a green status indicator.
- 5. Note the server address shown at the top - it will be
http://localhost:1234by default.
The server is now running and ready to accept requests from WebHarvy. Keep LM Studio open while you are scraping.
Step 4: Connect LM Studio to WebHarvy
LM Studio's server is fully compatible with the OpenAI API format. In WebHarvy, you configure it using the OpenAI-compatible provider option.
- 1. In WebHarvy, open Settings from the main menu or toolbar.
- 2. Go to the AI tab in the Settings window.
- 3. Under AI provider, select OpenAI (since LM Studio uses the OpenAI protocol).
- 4. In the Server URL field, enter:
http://localhost:1234/v1 - 5. In the API Key field, enter any placeholder value - for example,
lm-studio. LM Studio does not validate the key for local connections, but the field must not be left blank. - 6. In the Model field, enter the identifier of the model you loaded in LM Studio. You can copy it from the model selector in LM Studio's Developer panel.
- 7. Click Save or OK to apply the settings.
WebHarvy will now route all AI extraction requests through your local LM Studio server. The scraping steps are identical to those described in the Ollama section above.
Using OpenAI or Anthropic (Cloud AI)
If you prefer the convenience and performance of a cloud-based AI model, WebHarvy also supports OpenAI (GPT models) and Anthropic (Claude models). These require an API key and a paid subscription, but they offer higher accuracy and require no local hardware resources.
Video
The following video demonstrates how to connect WebHarvy to OpenAI and Anthropic for AI-assisted web scraping, without writing any code.
Connecting OpenAI to WebHarvy
- 1. Create an account at platform.openai.com if you do not already have one.
- 2. Go to API Keys in your account dashboard and click Create new secret key. Copy and save the key - you will not be able to view it again.
- 3. In WebHarvy, open Settings and go to the AI tab.
- 4. Under AI provider, select OpenAI.
- 5. Paste your API key into the API Key field.
- 6. In the Model field, choose a model -
gpt-4o-miniis a good starting point as it is fast and cost-effective. For higher accuracy, usegpt-4o. - 7. Click Save to apply the settings.
Connecting Anthropic to WebHarvy
- 1. Create an account at platform.claude.com if you do not already have one.
- 2. Go to API Keys in the Anthropic Console and click Create Key. Copy and save the key.
- 3. In WebHarvy, open Settings and go to the AI tab.
- 4. Under AI provider, select Anthropic.
- 5. Paste your API key into the API Key field.
- 6. In the Model field, choose a model -
claude-haiku-4-5is fast and affordable, whileclaude-sonnet-4-5offers higher accuracy. - 7. Click Save to apply the settings.
Once configured, the scraping process in WebHarvy is the same as described in the Ollama section. The AI extraction steps work identically regardless of which provider you choose.
Why Use a Local LLM for Web Scraping?
- Free to use - No API costs or subscriptions. Run as many scrapes as you like.
- Privacy - Your data never leaves your PC. Ideal for scraping sensitive or confidential sources.
- Works offline - Once the model is downloaded, no internet is needed for AI processing.
- No rate limits - Cloud AI services often throttle how many requests you can make per minute. With a local model, there are no such restrictions.